Create Cheqroom application in OneLogin
-
Log in to your OneLogin account
-
Go to Applications and click Add App
-
Then, search for SAML Custom Connector in the Find applications section and click SAML Custom Connector (Advanced)
Log in to your OneLogin account
Go to Applications and click Add App
Then, search for SAML Custom Connector in the Find applications section and click SAML Custom Connector (Advanced)
-
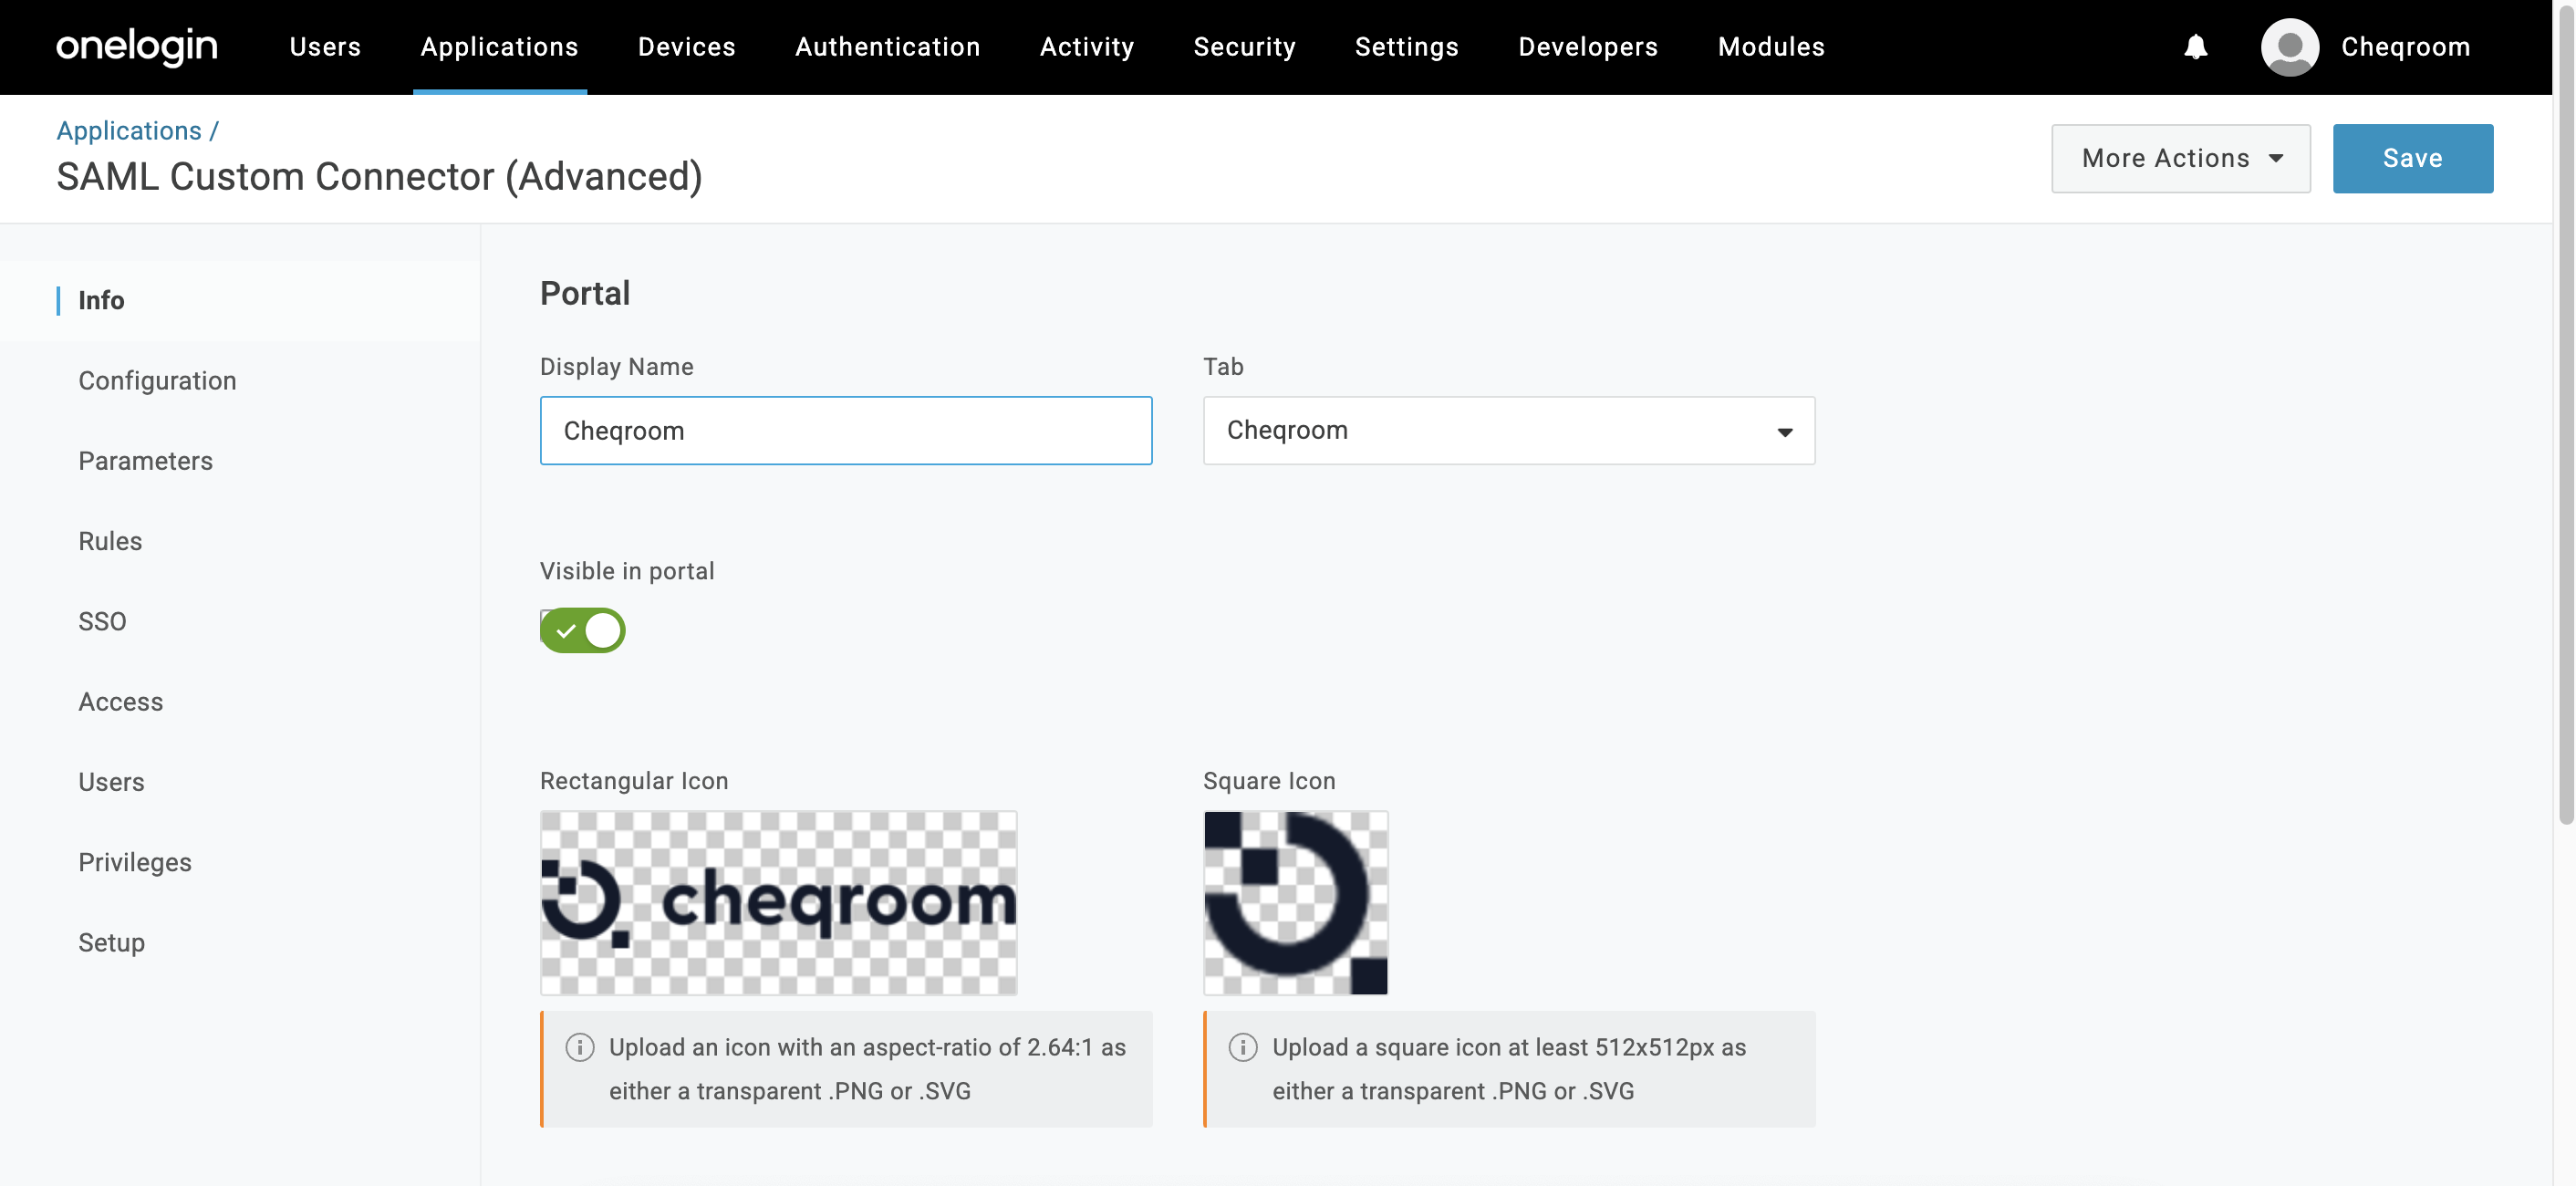
Add details for SAML Custom Connection application
-
Type name of the application (f.e Cheqroom)
-
Rectangular icon
-
Square icon
-
Click Save to add the application

-
-
Next, go to the Configuration tab to enter the Cheqroom metadata details
-
Audience (EntityID) Here you need to paste the Audience URI (Entity ID) value.
-
Recipient
-
Here you need to paste the Single sign on url value.
-
-
ACS (Consumer) URL Validator
-
Here you need to paste the Single sign on url value.
-
-
ACS (Consumer) URL
-
Here you need to paste the Single sign on url value.
-
-
Add details for SAML Custom Connection application
-
Type name of the application (f.e Cheqroom)
-
Rectangular icon
-
Square icon
-
Click Save to add the application
- Click Save to add the application
Next, go to the Configuration tab to enter the Cheqroom metadata details
-
Audience (EntityID) Here you need to paste the Audience URI (Entity ID) value.
-
Recipient
-
Here you need to paste the Single sign on url value.
-
-
ACS (Consumer) URL Validator
-
Here you need to paste the Single sign on url value.
-
-
ACS (Consumer) URL
-
Here you need to paste the Single sign on url value.
-
⚠️ Please see Get Cheqroom Metadata to enter in OneLogin for more information on the steps for the Configuration tab.
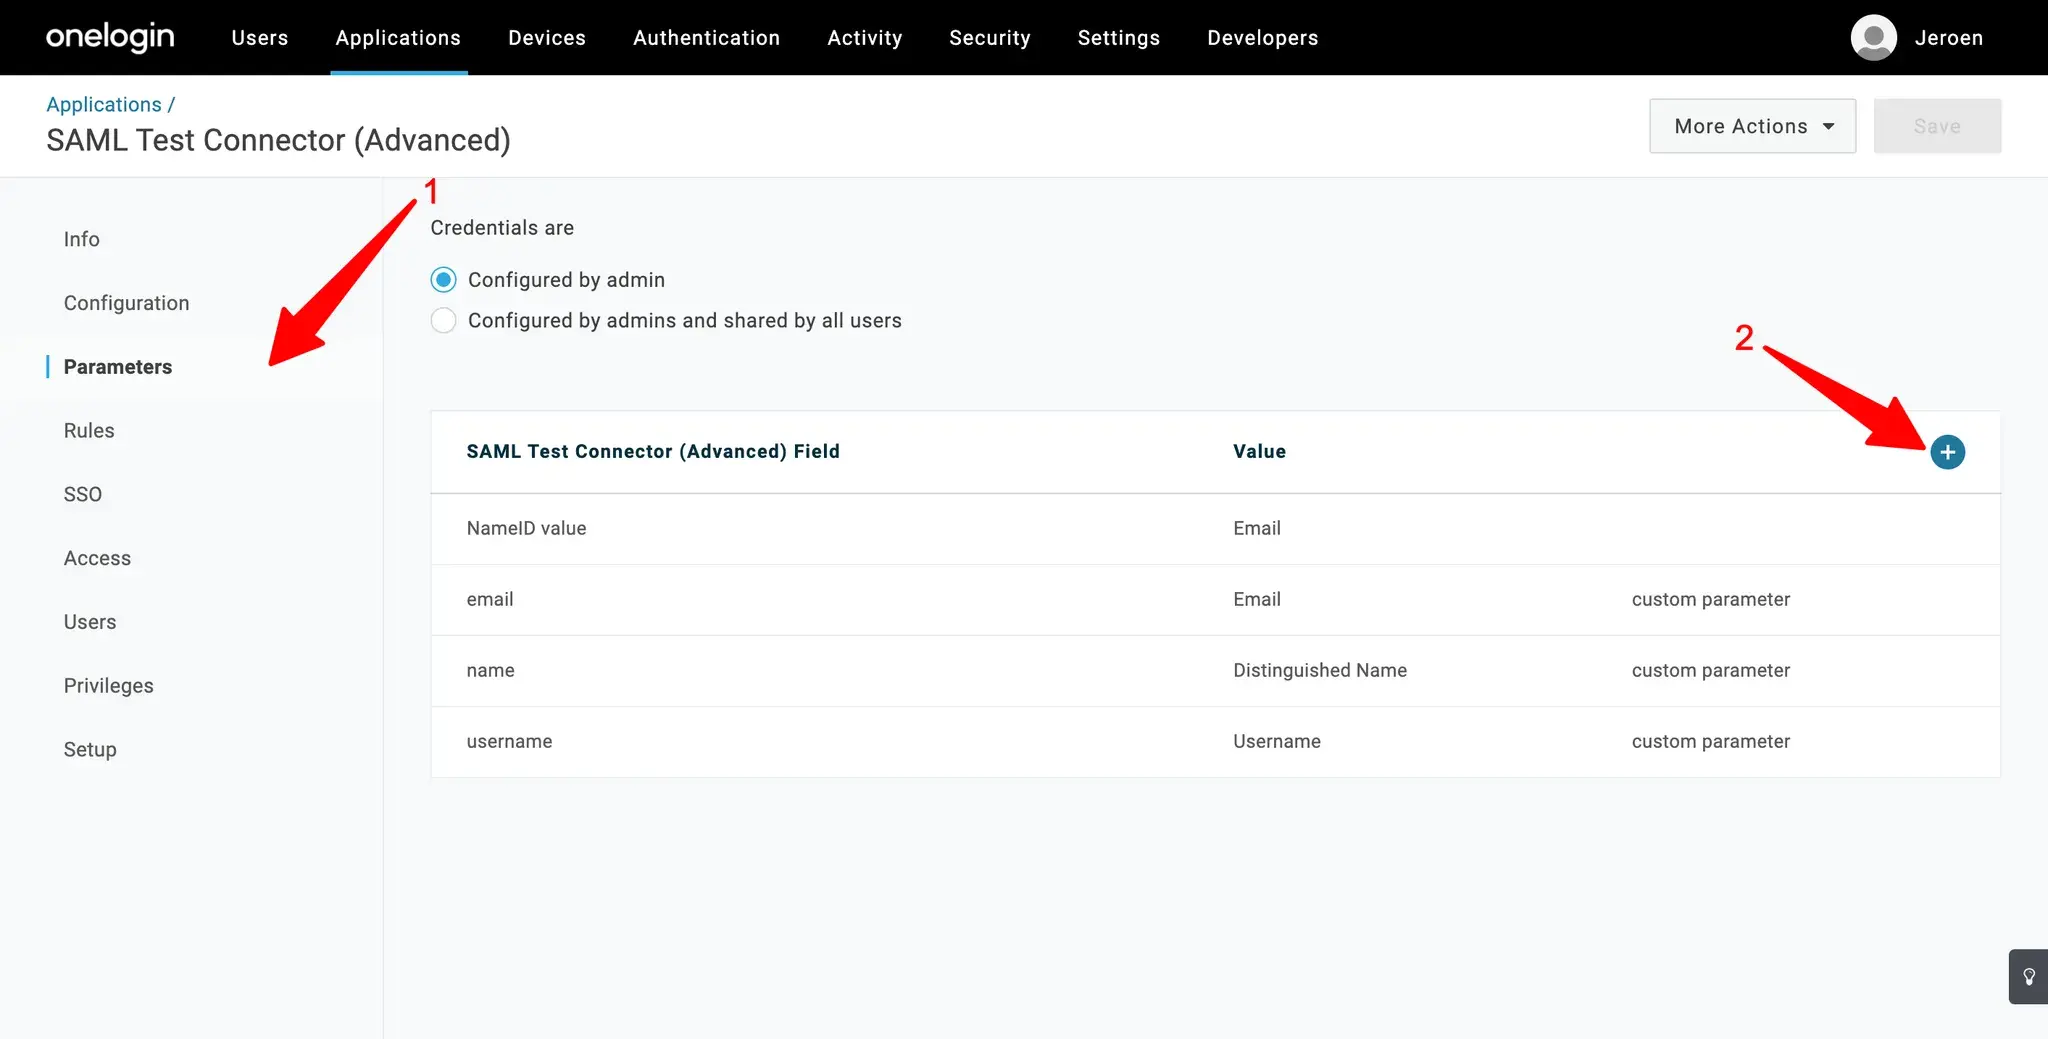
Next, go to Parameters tab to configure which user data will be sent back to Cheqroom. Here we will add an extra email claim to be sent back to Cheqroom, this is a required field and needs to be sent back.
-
Click Plus icon
-
Fill in email as field name, select Include to SAML assertion and click Save
 Then make sure to map the Value to a filled-in email field and click Save
- Additionally you can also add
nameand any other information you want to sent back to Cheqroom. See Configure SSO Attribute mapping how to link this information in Cheqroom. - Click Save
- Next, go to the Access tab or Users tab to configure which users can access the Cheqroom application
Next, go to Parameters tab to configure which user data will be sent back to Cheqroom. Here we will add an extra email claim to be sent back to Cheqroom, this is a required field and needs to be sent back.
-
Click Plus icon
-
Fill in email as field name, select Include to SAML assertion and click Save
-
Then make sure to map the Value to a filled-in email field and click Save
Additionally you can also add name and any other information you want to sent back to Cheqroom. See Configure SSO Attribute mapping how to link this information in Cheqroom.
-
Click Save
Next, go to the Access tab or Users tab to configure which users can access the Cheqroom application
⚠️ Don’t forget this step, otherwise you won’t be able to login because none of your users will have access to the Cheqroom application. See User not assigned access to login
Get OneLogin Metadata to enter in Cheqroom
-
Log in to your OneLogin account
-
Go to Applications > Cheqroom
-
Go to the SSO tab
-
Copy the Issuer URL
Get Cheqroom Metadata to enter in OneLogin
-
Log in to your Cheqroom account
-
Go to Settings > Authentication
-
Enable or edit SSO configuration:
-
If you haven’t enabled your SSO configuration already, click the Enable SAML SSO toggle
-
If SAML SSO is already enabled, click Edit SSO Configuration
-
-
The Cheqroom metadata section provides all required information you need to enter in OneLogin
Enable SSO in Cheqroom
-
Log in to your Cheqroom account
-
Go to Settings > Authentication
-
Click Enable SAML SSO toggle
-
Choose OneLogin as SAML Identity Provider
-
Cheqroom Metadata is needed to setup a Cheqroom application in OneLogin, see Create Cheqroom application in OneLogin
-
Enter metadata url of OneLogin, see Get OneLogin Metadata to enter in Cheqroom
-
Click Next to go to the Settings configuration step
-
Roles configuration
-
Choose a Default role, this will be assigned to a user who logs in through OneLogin but has no assigned role. Here we recommend using a role that hasn't got a lot of permissions (for example the Equipment Viewer role)
-
Choose how user roles are managed, this lets you choose if you want to manage the roles from OneLogin or keep the role management in Cheqroom. See Configure how roles are managed for SSO for more information.
-
-
User groups configuration This option is only available if you have created some user groups for your account, see Create User Groups
-
Choose a Default user group
-
Choose how user groups are managed, see Configure how user groups are managed for SSO
-
-
Click Next to go the the Attribute mappings step
-
See Configure SSO attribute mapping for configuring attribute mapping
-
-
Click Next to go the the Test connection step
-
Log in to your OneLogin account
-
Go to Users > Custom User Fields
-
Click New User Field
-
New User Field
-
Fill in a name (f.e. Cheqroom Role)
-
Enter shortname: (f.e cheqroom__role)
-
Click Save
-
Configure User Roles in OneLogin
ℹ️Example use case
You have a Teachers role in your OneLogin account and you want all the users in this role to get the Super admin role in Cheqroom when they login
-
Log in to your OneLogin account
-
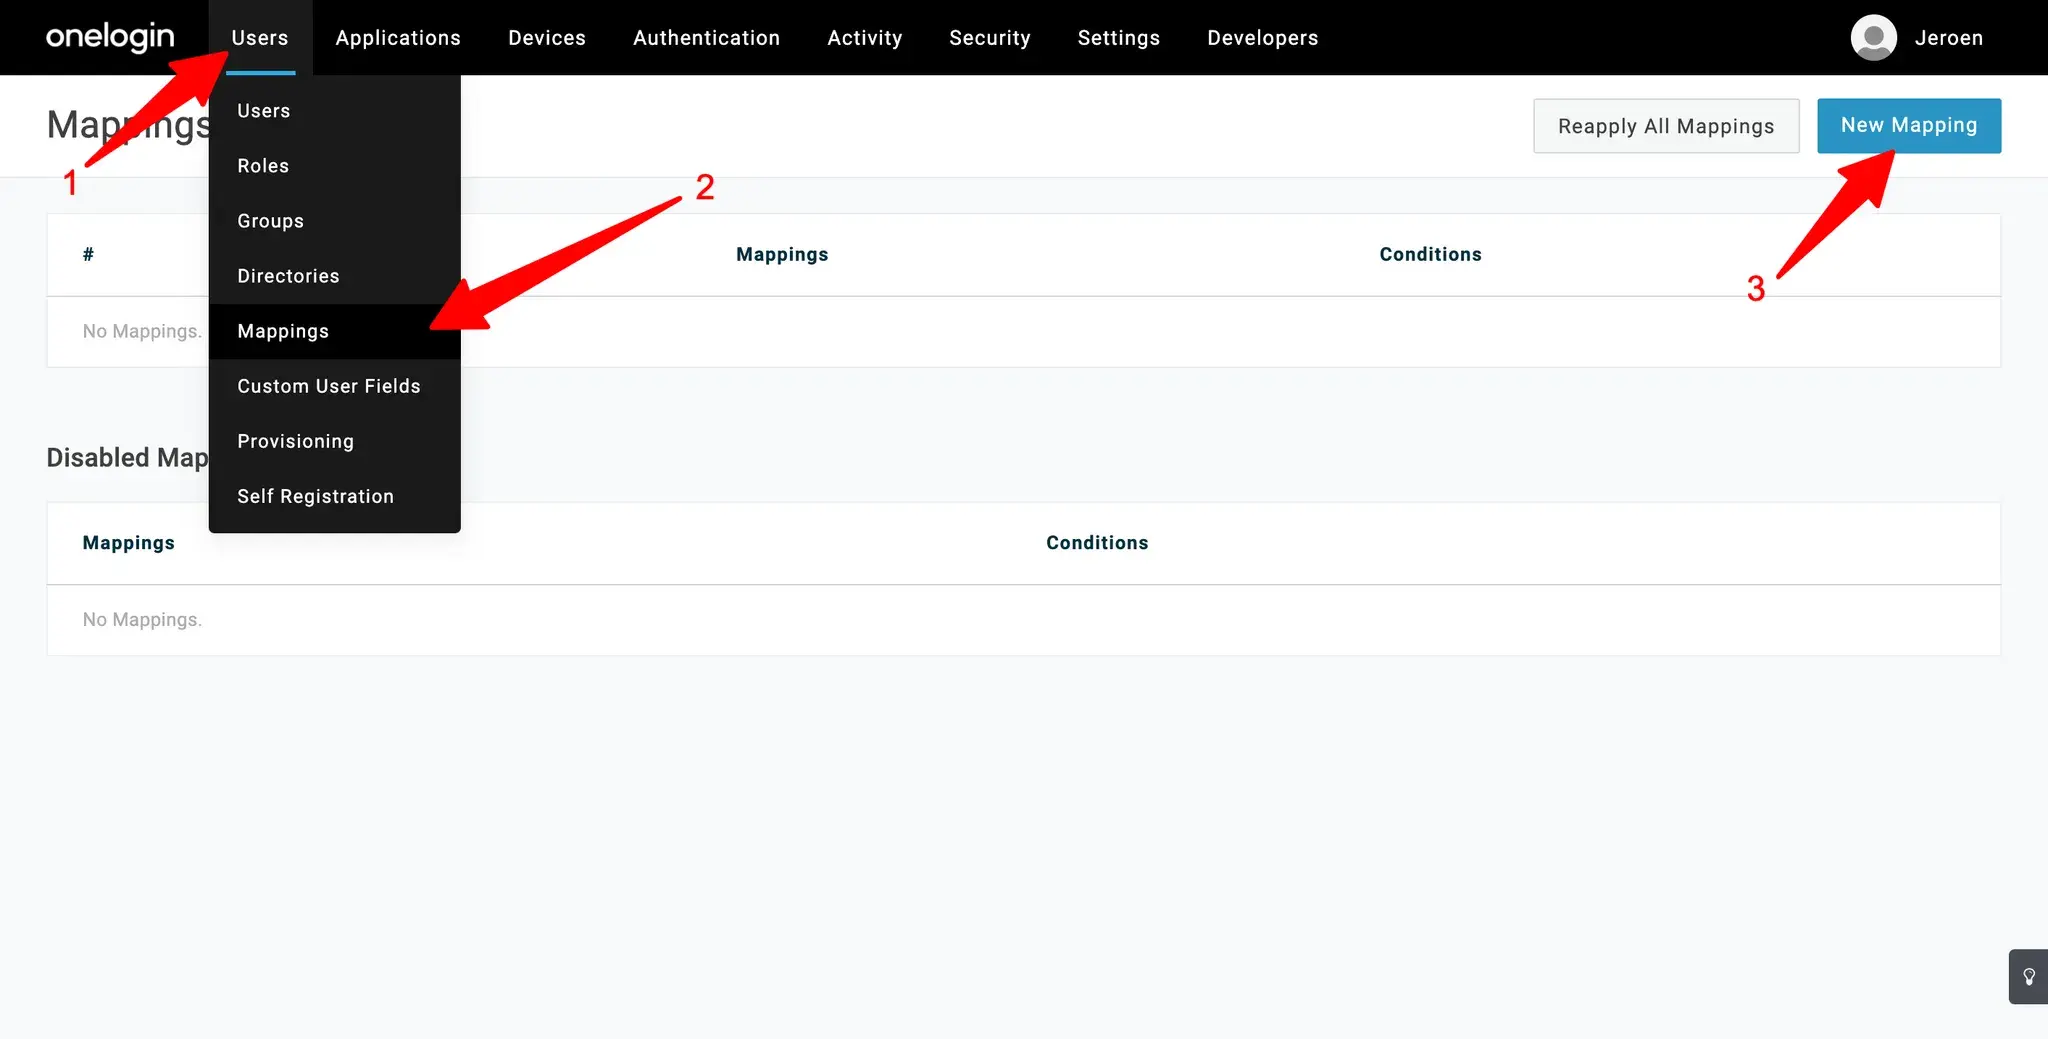
Go to Users > Mappings
-
Click New Mapping
-
New mapping:
-
Fill in a mapping name (f.e. Cheqroom Super Admins Roles)
-
Configure a condition, in our use case Roles include Teachers The condition defines when a certain action will trigger, so here when OneLogin user roles includes Teachers then the action will trigger
-
Configure an action, in our use case
-
Select Set Cheqroom Role The name of the field you see here depends on how you named the custom field you added in OneLogin, see Add custom field in OneLogin
-
Enter the role value we want to assign, in our use case super_admin See Configure how roles are managed for SSO to get role value
-
-
Click Save
-
Repeat the above steps if you want to assign more roles through OneLogin
-
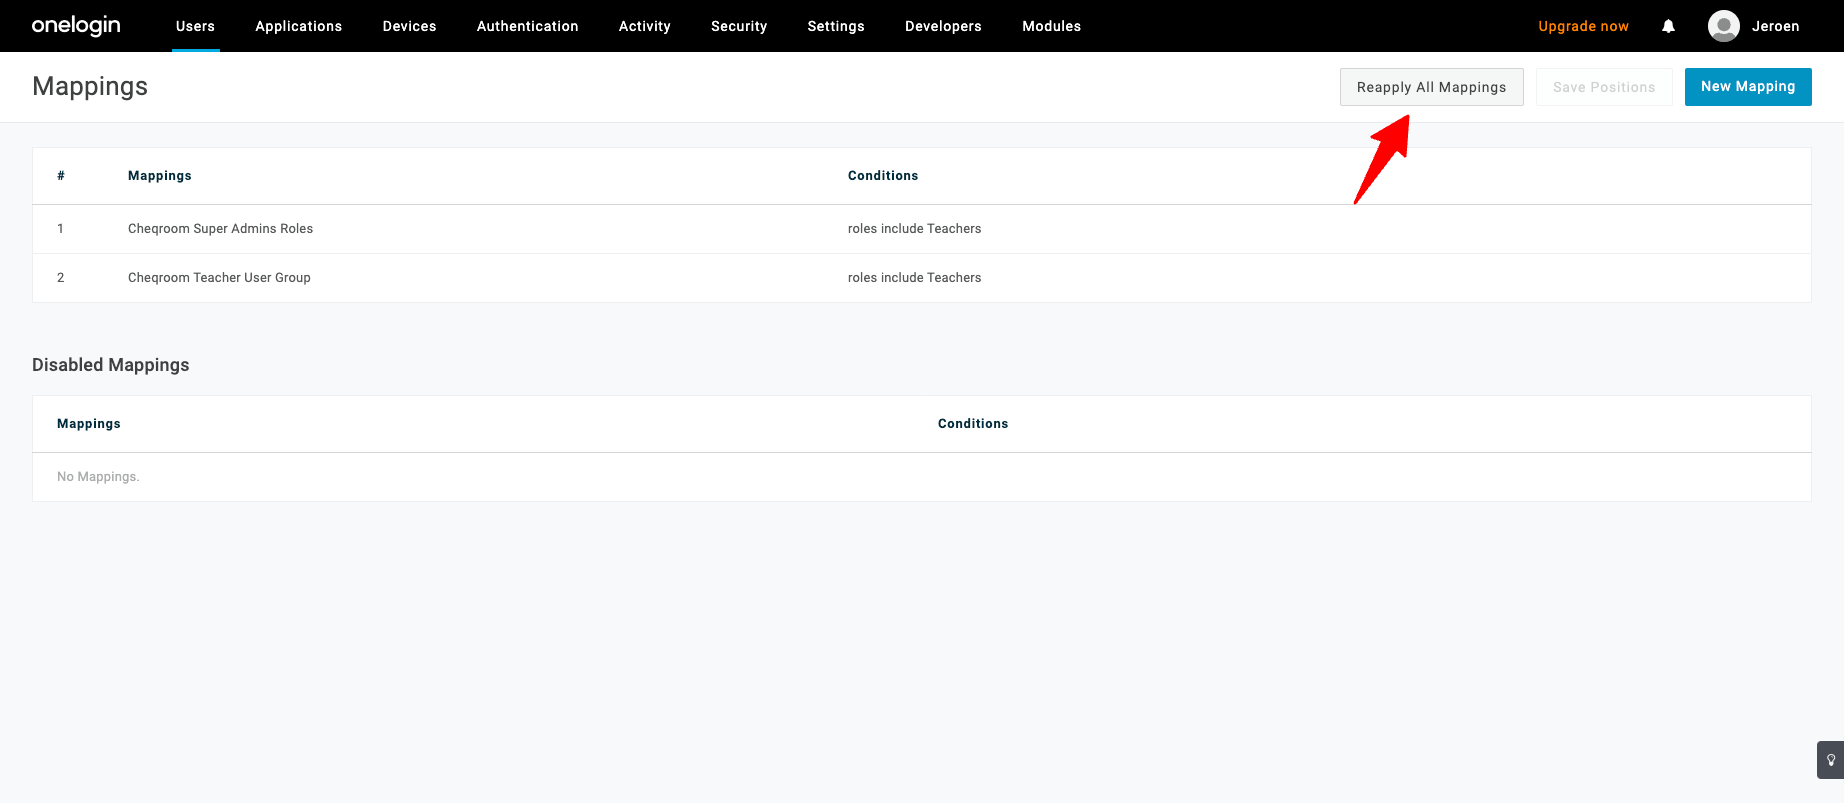
Click Reapply All Mappings This will make assign the correct Cheqroom role to your users based on your configured mappings
Click Reapply All Mappings This will make assign the correct Cheqroom role to your users based on your configured mappings
Optional if you haven’t configured the Cheqroom application yet to return cheqroom__role parameter
-
Go to Applications > Cheqroom application
-
Go to the Parameters tab
-
Click Plus icon
-
Fill in cheqroom__role as field name, select Include to SAML assertion and click Save
-
Then also make sure to select our custom user field Cheqroom Role as value for the newly added field and click Save
-
Configure User Groups in OneLogin
ℹ️ Example use case
You have a Teachers role in your OneLogin account and you want all the users in this role to get the Teachers user group in Cheqroom when they login
-
Log in to your OneLogin account
-
Click New Mapping
Log in to your OneLogin account
Click New Mapping
-
New mapping:
-
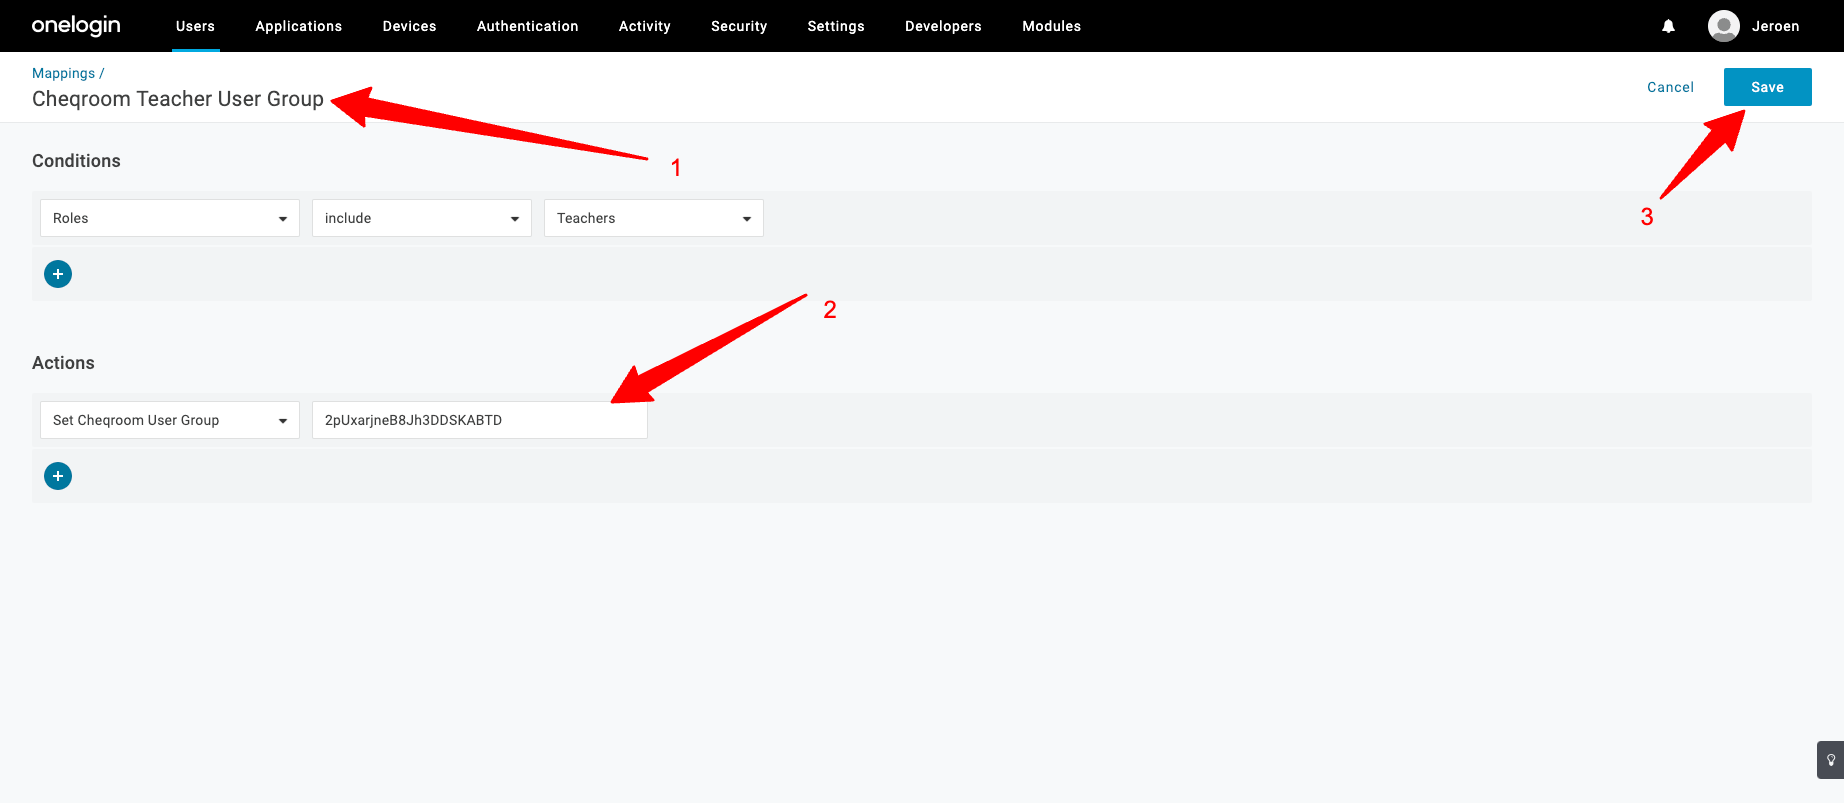
Fill in a mapping name (f.e. Cheqroom Teacher User Group)
-
Configure a condition, in our use case Roles include Teachers The condition defines when a certain action will trigger, so here when OneLogin user roles includes Teachers then the action will trigger
-
Configure an action, in our use case
-
Select Set Cheqroom User Group(s) The name of the field you see here depends on how you named the custom field you added in OneLogin, see Add custom field in OneLogin
-
Enter the user group value we want to assign, in our use case f.e 2pUxarjneB8Jh3DDSKABTD. See Configure how User Groups are managed for SSO to get user group id value
-
-
💡Enter multiple user groups ids separated with a semicolon (;) if you want to assign multiple user groups to certain users
-
Click Save
Repeat the above steps if you want to assign more user groups through OneLogin
-
Click Reapply All Mappings This will make assign the correct Cheqroom user group to your users based on your configured mappings
Optional if you haven’t configured the Cheqroom application yet to return cheqroom__user_group parameter
-
Go to Applications > Cheqroom application
-
Go to the Parameters tab
-
Click Plus icon

-
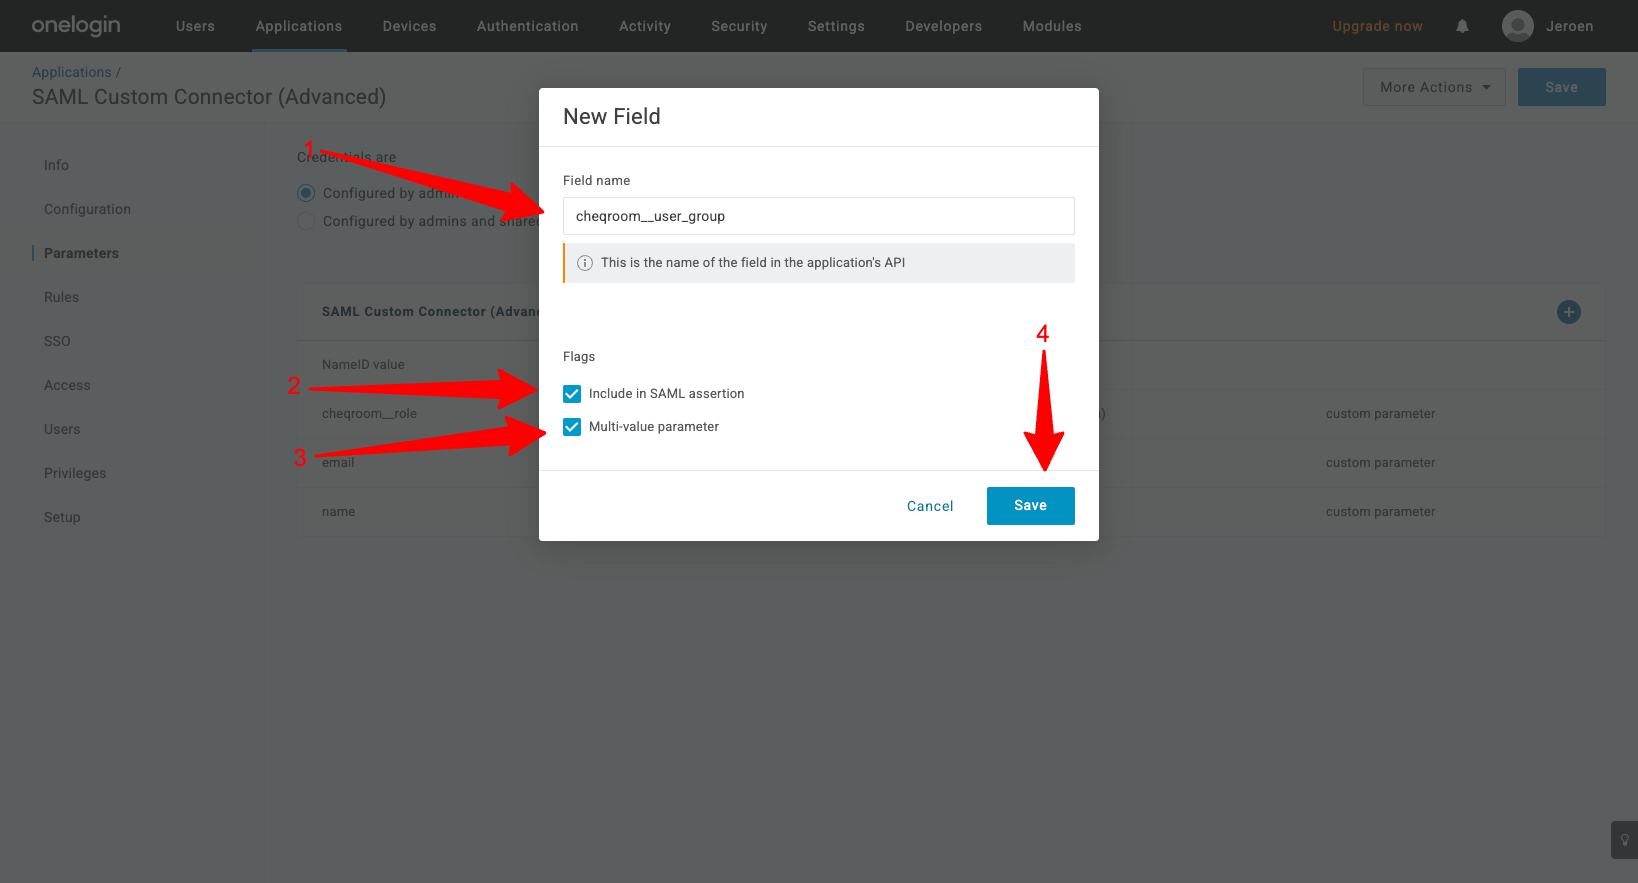
New Field
-
Fill in cheqroom__user_group as field name
-
Select Include in SAML assertion
-
Select Multi-value parameter
-
Click Save
-

-
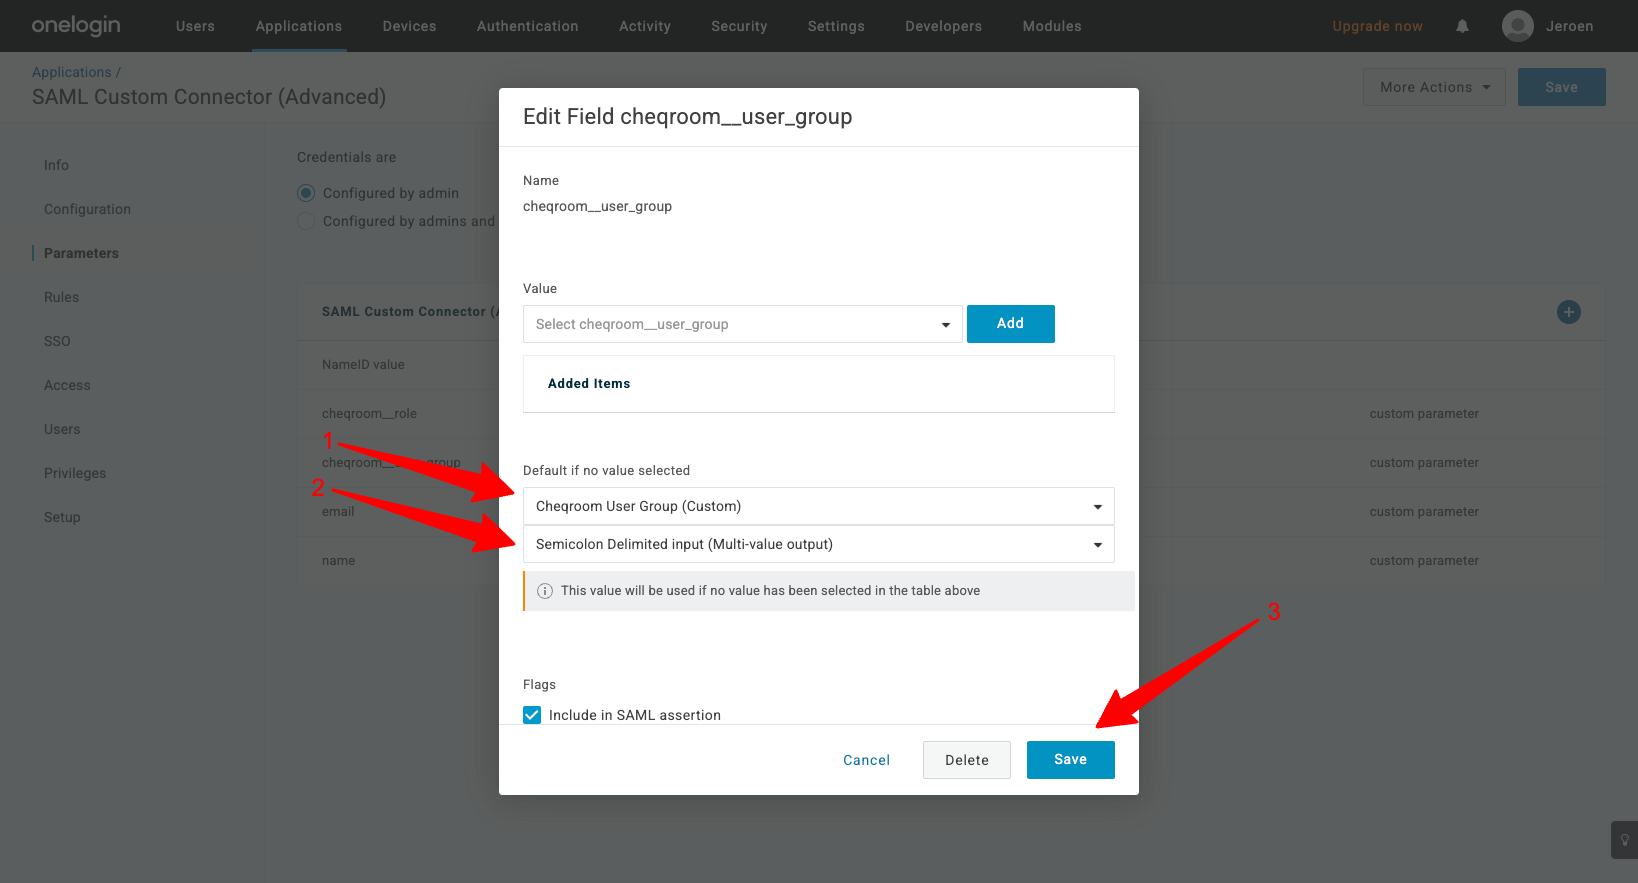
Edit Field cheqroom__user_group
-
Select Cheqroom User Group (Custom)
-
Select Semicolon Delimited Input (Multi-value output)
-
Click Save
-
-
Go to Applications > Cheqroom application
Go to the Parameters tab
-
Click Plus icon
Click Plus icon
-
New Field
-
Fill in cheqroom__user_group as field name
-
Select Include in SAML assertion
-
Select Multi-value parameter
-
Click Save
-
-
Edit Field cheqroom__user_group
-
Select Cheqroom User Group (Custom)
-
Select Semicolon Delimited Input (Multi-value output)
-
Click Save
-