How To: Create Custom DYMO Labels
How to design custom asset labels for your equipment in different layouts and sizes by using the DYMO LabelWriter software
Once a printer from the DYMO LabelWriter series is installed on your computer, you can use the DYMO Connect software to create custom labels for your workspace.
You can also download one of the existing templates from your workspace to modify it, which may be an easier approach for most users. These are available in the Settings > Templates page.
Creating a New Template
- Launch the DYMO Connect software
- Click New on the top left corner, and then select your label type on the top right side of the screen
- Use the Add drop-down menu to add elements to your label layout
- You can add Text elements to dynamically populate data from Cheqroom
- You can add Text elements to dynamically populate data from Cheqroom
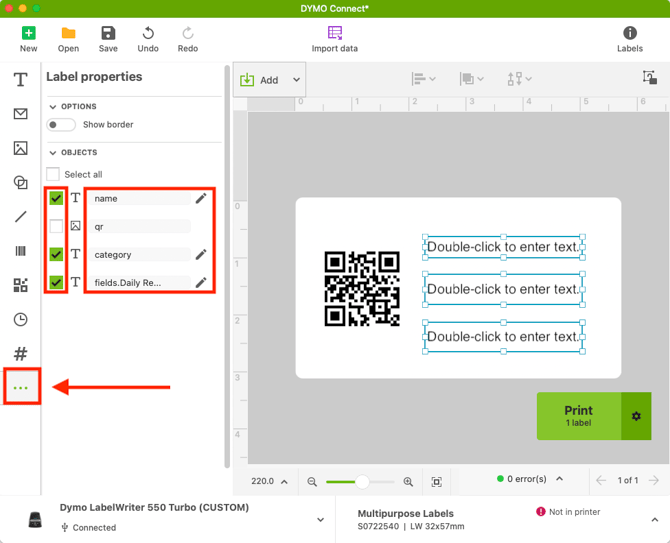
- Click on the ... button on the left side menu
- add a checkmark to the fields you would like to dynamically populate
- Click on the pencil icon next to each field, and type a merge field in from the list below as the object name. The text box itself must remain empty
- Click Save on the top menu bar
Importing a Custom Template
Once a custom template has been created, you can proceed to import it to your workspace to start printing it from Cheqroom to attach to your gear, by following the steps below:
- Click on "Settings" from the navigation bar on the left
- Click on "Templates"
- Click "New template..." on the top right
- From the pop-up, click on "Dymo"
- Once at the new page, click "Upload or drop a file here" to select the file, or simply drag and drop your file to that area
- Click "Preview & save..." on the top right
- Click "Update" on the new pop-up
- Rename your template by clicking into the name field - by default it will be set to "Dymo Template"
- Start printing!
Available merge fields
nameThe item/kit namecodeThe textual part of a QR codeqrThe image version of a QR codebarcodeThe barcode textorganizationYour account organization namelocationAssigned location namecategoryAssigned category namefields.BrandThe value of the Brand fieldfields.ModelThe value of the Model fieldfields.Serial numberThe value of the Serial number fieldfields.Purchase dateThe value of the Purchase date fieldfields.Purchase priceThe value of the Purchase price fieldfields.Warranty dateThe value of the Warranty date fieldfields.Residual valueThe value of the Residual value fieldfields.Some fieldThe value of a custom field
Important note
- Use the
Reference nameto make design elements dynamic - The smallest size for QR codes designs is approx. 1" square
- The smallest size for barcode designs is approx. 2" wide

