![horizontal-black-3.png]](https://knowledge.cheqroom.com/hs-fs/hubfs/horizontal-black-3.png?width=200&height=37&name=horizontal-black-3.png)
Note: Operations Requests are an add on feature. Meet with us to get started.
A double-booked studio. A broken green screen that nobody flagged. A room that was "available" but actually wasn't. Cheqroom makes sure this never happens again.
1. How to Set Up Your Spaces as Assets
In Cheqroom, rooms and studios aren't just calendar entries, they're tracked assets in their own right. Create spaces as dedicated item types and use Custom Fields to capture the specifications that matter to your team. If you need to enable additional item types, please follow these steps.
Suggestions Include:-
- Seating Capacity: (Number field)
- Wall Finish / Backdrop Type: (Dropdown: Painted Cyc, Green Screen, Brick, etc.)
- Lighting Configuration: (Text field: e.g., "3-point Arri kit, overhead grid")
- Room Category: (Dropdown: Production Studio, Edit Suite, Conference Room, Storage)
Tip: Set "Room Category" as a Required field so every space is properly classified from the moment it's created. This makes filtering and reporting across your facility significantly easier.
2. Tying Gear to Spaces with Locked Kits
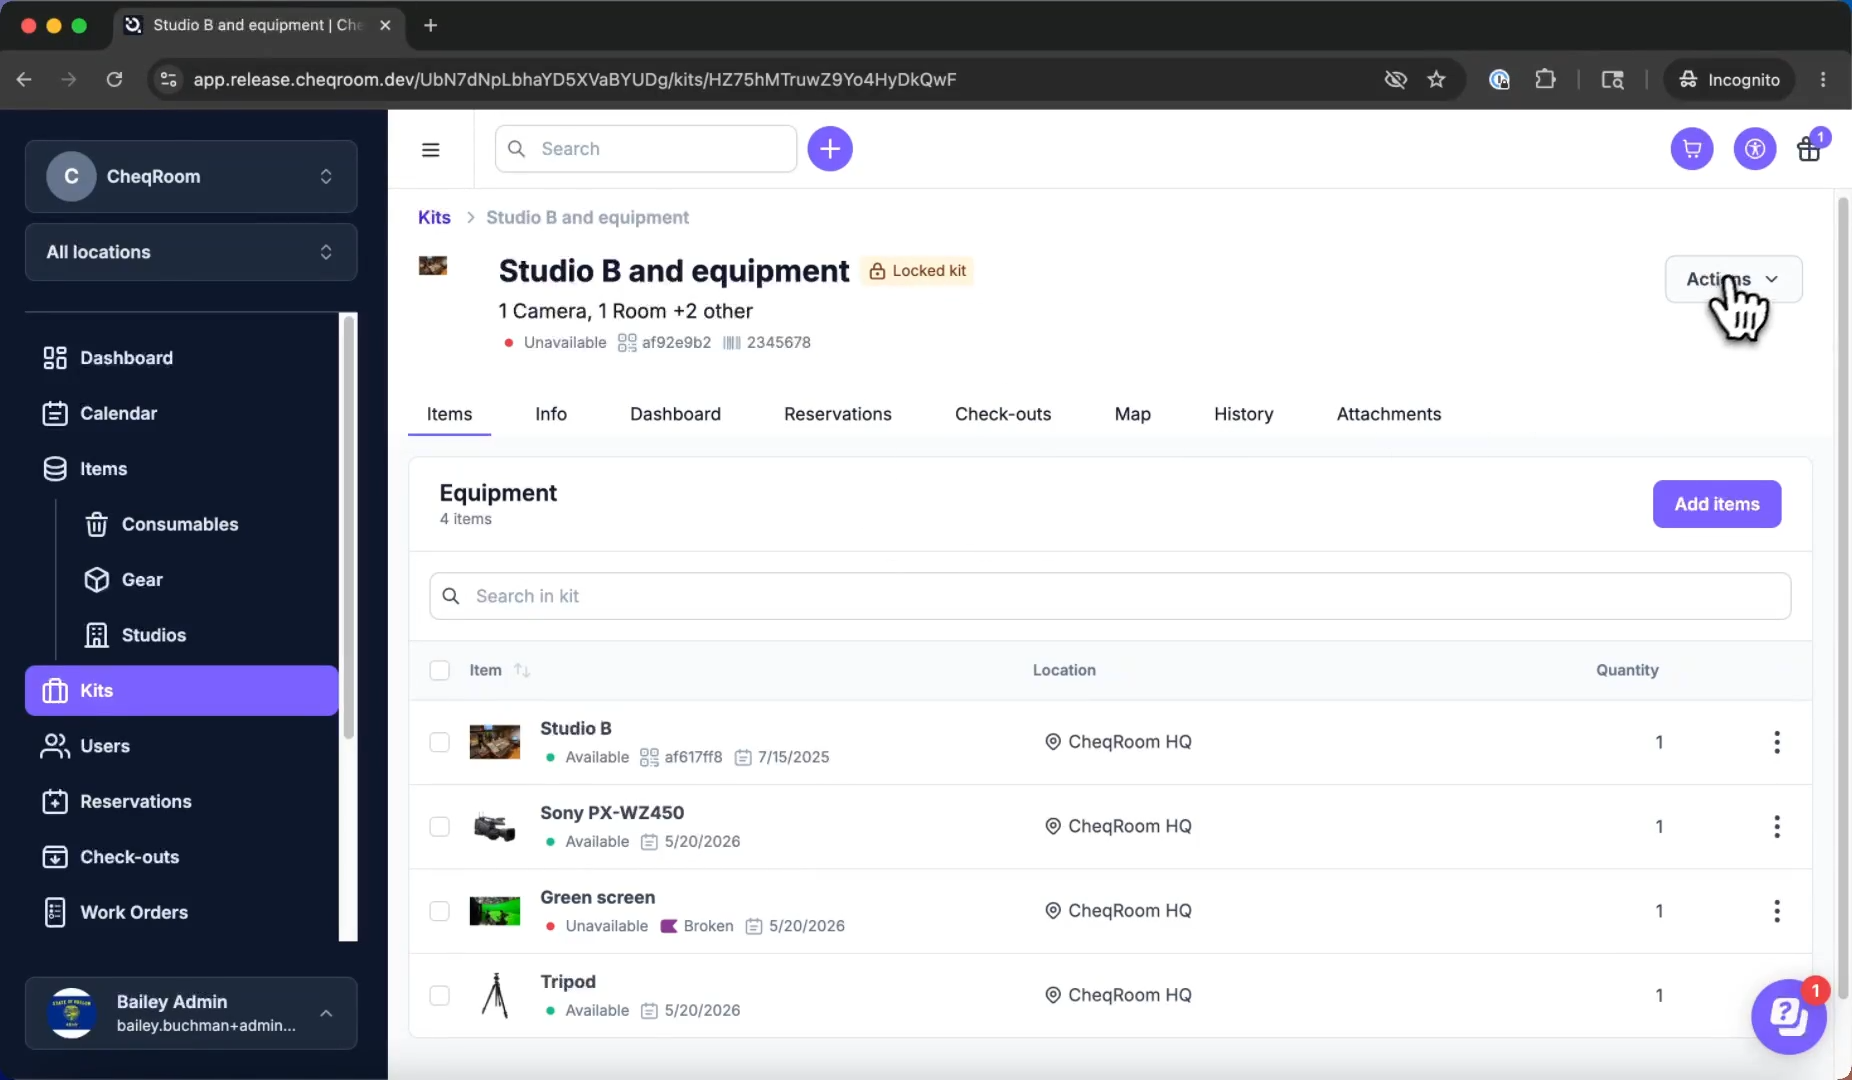
The most powerful way to manage a production space is to bundle its permanent equipment, cameras, tripods, green screens, audio interfaces, into a Locked Kit tied directly to that room. Unlike standard kits, locked kits keep assets bound to their space and prevent them from being accidentally checked out as individual items.
Why this matters: When someone books Studio B, they book everything in it. No more hunting for the tripod that was "borrowed" last Tuesday.
3. The Facilities Workflow
Move from a reactive "something's broken" call to a structured, auditable maintenance cycle by following these steps:
|
Step |
Action |
Cheqroom Capability |
| 1. Catalog | Build your space inventory. | Use Custom Item Types to distinguish rooms, studios, and infrastructure from portable equipment. |
| 2. Equip | Assign permanent gear and fixed assets to each space. | Create Locked Kits so room-specific equipment stays where it belongs. |
| 3. Book | Manage space availability and the preventative maintenance that keeps rooms available. | Use Reservations with the Gantt Timeline to visualize occupancy across days, weeks, or hours. |
| 4. Flag | Report damage or issues in real time. | Use Item Flags to isolate a problem, describe the damage, and trigger automatic admin email alerts. |
| 5. Resolve | Turn a flag into a repair task. | Open a Maintenance Work Order, assign a responsible party, set a deadline, and log labor hours. |
| 6. Sign Off | Confirm the space is back in service. | Use Work Order Checklists to capture digital signatures and close the loop with a physical accountability record. |
| 7. Analyze | Review facility data to optimize utilization and plan ahead. | Use Insights and Reporting to track room downtime, evaluate equipment lifespan, and justify capital planning budgets. |
4. Industry Use Cases
🎥 Media & Broadcast: Studio Fleet Management
- The Challenge: Tracking which studios are available, which are mid-repair, and which have equipment issues, all at the same time and across locations.
- The Edge: Use the Gantt Timeline view filtered by room asset to get a color-coded, multi-day picture of studio occupancy. Pair this with Item Flags so any engineer on the floor can instantly surface a problem without waiting for a post-shoot debrief.
🎒 Higher Education: Shared Production Labs
- The Challenge: Students sharing studios across departments with no clear ownership of what's in each room or what condition it's in.
- The Edge: Use Locked Kits to permanently assign equipment to each lab room, and require a Checklist Sign-Off at checkout and return. When something's broken, the flag log tells you exactly who had the space last.
🌏 Enterprise: Multi-Location Facilities
- The Challenge: Coordinating space availability, maintenance tickets, and asset condition across multiple offices or campuses.
- The Edge: Pin each room asset to its physical location in Cheqroom so facilities managers in different buildings are working from the same system — not separate spreadsheets.
📣 Some Best Practices for Scaling
- One space, one record: Every room should have its own asset entry in Cheqroom. If it's bookable, it's trackable. Resist the temptation to manage spaces in a separate calendar tool.
- Flag it before you leave: Build a culture where the last person out of a studio files an Item Flag for any damage, no matter how small. Catching it now beats discovering it 10 minutes before the next booking.
- Use Work Orders for every repair: Don't resolve facility issues over Slack or email. A Work Order creates a timestamped record with labor hours logged, making it easy to justify maintenance budgets and headcount requests.
- Review your Gantt weekly: A weekly scan of the Timeline view helps facilities managers spot utilization patterns — underused spaces, chronic double-bookings, or rooms perpetually stuck in "under maintenance" status.
The Cheqroom Difference: A room booking system tells you when a space is reserved. Cheqroom tells you whether it's ready — whether the gear is in it, whether anything is flagged, and whether the last maintenance ticket was ever closed. It's the operational layer that turns your floor plan into a managed asset.
Supporting Resource: [Video] How to Manage Facilities and Spaces in Cheqroom