![horizontal-black-3.png]](https://knowledge.cheqroom.com/hs-fs/hubfs/horizontal-black-3.png?width=200&height=37&name=horizontal-black-3.png)
Accessing Reports
Cheqroom Reports give you pre-built and customizable views of your equipment, reservations, check-outs, and more — helping you make informed decisions about your inventory. To get started, follow these steps to open the Reports tab in your Cheqroom account:
-
Sign in to your Cheqroom account.
-
Click the Reports tab on the left-hand side of the screen.
Then, after accessing the Reports, it's essential to understand how to navigate and utilize them effectively!
Default Reports
Cheqroom includes pre-configured reports across four categories — Items, Kits, Reservations, and Check-outs — covering the most common equipment management needs:
Reports on Items
-
Depreciation: How much is our equipment currently worth?
-
Flagged items: Which items are currently flagged?
-
History of equipment custody: Which item has been in custody for a certain time?
-
History of equipment issues: How often did items get flagged during a certain period of time?
-
Items check-outs over time: What are the busy times during the year?
-
Items location overview: What's the current location of our equipment?
-
Items utilization: How often was your equipment booked?
-
Items utilization in check-outs: How often was your equipment checked out?
-
Items utilization in reservations: How often was your equipment reserved?
-
Items current state: What items are in custody, flagged, checked out, in maintenance, or simply unavailable?
-
Items in custody: Who has long-term custody of which equipment?
-
Items per category: How many items do you have in each category?
-
Return list: Which equipment are you expecting back?
-
Warranty status: When does your gear go out of warranty?
Reports on Kits
-
Kit utilization in check-outs: How often were your kits checked out?
-
Kit utilization in reservation: How often were your kits reserved?
Reports on Reservations
-
Busiest times for reservations: What are the busiest times in the equipment room?
-
Reservations by label: Which are the most popular labels for reservations?
-
Reservations per category: Which equipment category has been reserved most?
-
Reservations per contact: Who has the most reservations?
-
Reservations per location: Which locations had the most reservations?
Reports on Check-outs
-
Busiest times for check-outs: What are the busiest times in the equipment room?
-
Check-outs by label: Which are the most popular labels for check-outs?
-
Check-outs per category: Which equipment category is checked out most?
-
Check-outs per contact: Who has the most check-outs and brings back equipment on time?
-
Check-outs per location: Which locations had the most check-outs?
To locate specific Reports quickly, you can use the search bar or sort options at the top of the Report list.
Generating Custom Reports
Cheqroom allows you to generate custom Reports for situations requiring a more tailored approach based on your specific needs.
-
Click on Create Custom Report on the Reports page.
-
Choose the Report category (Items, Reservations, or Check-outs).
-
Select the field by which you want to group the report (e.g., category, location, custom field).
-
Click Create.
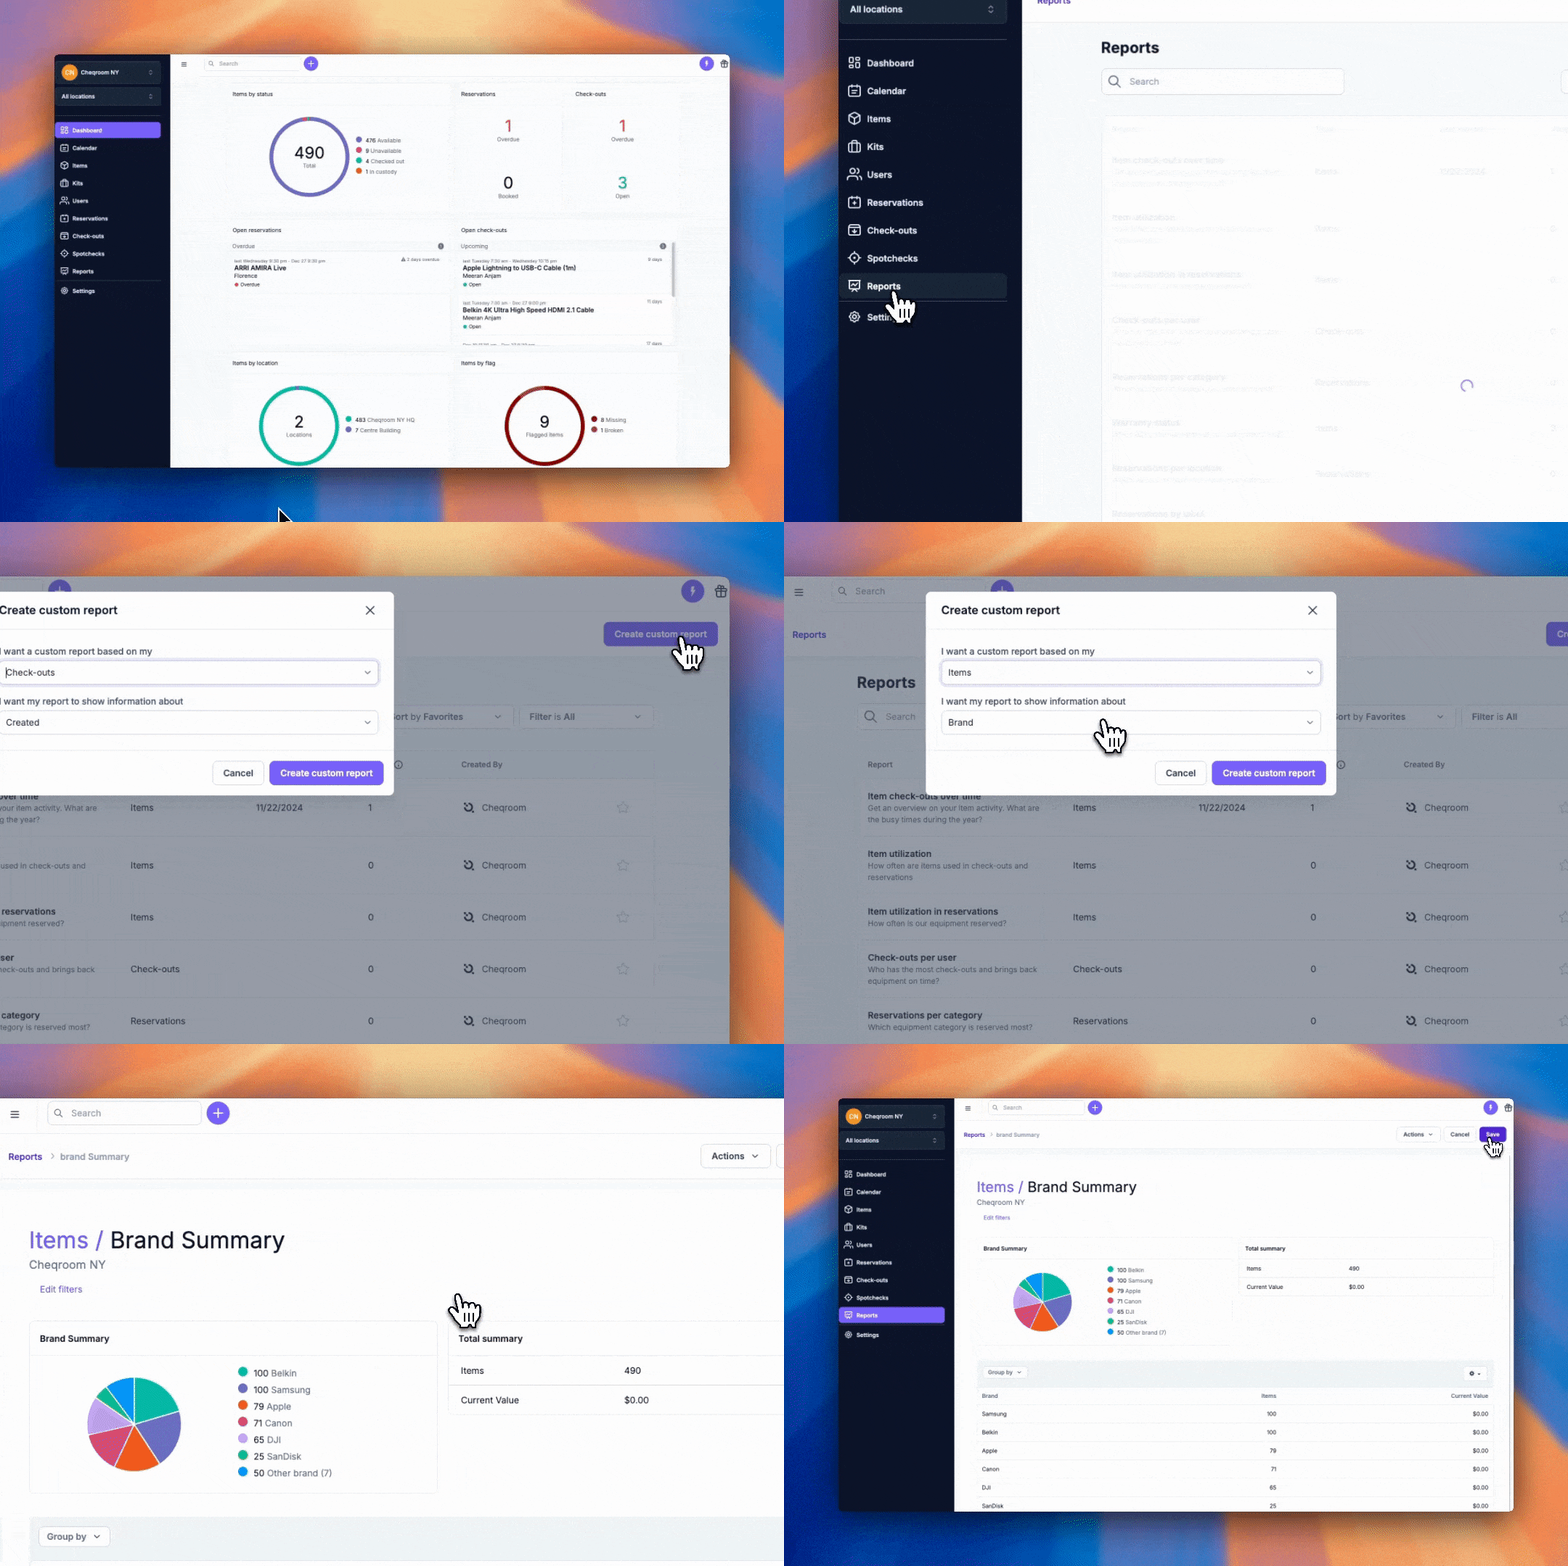
You can further customize the Report by adding filters or adjusting the timeframe.
Saving and Exporting Reports
Once you've generated a Report that meets your needs, you can save it for future reference.
-
Click Save in the top-right corner of the Report.
-
Enter a descriptive name and choose whether to make the Report public for all users with access to Reports.
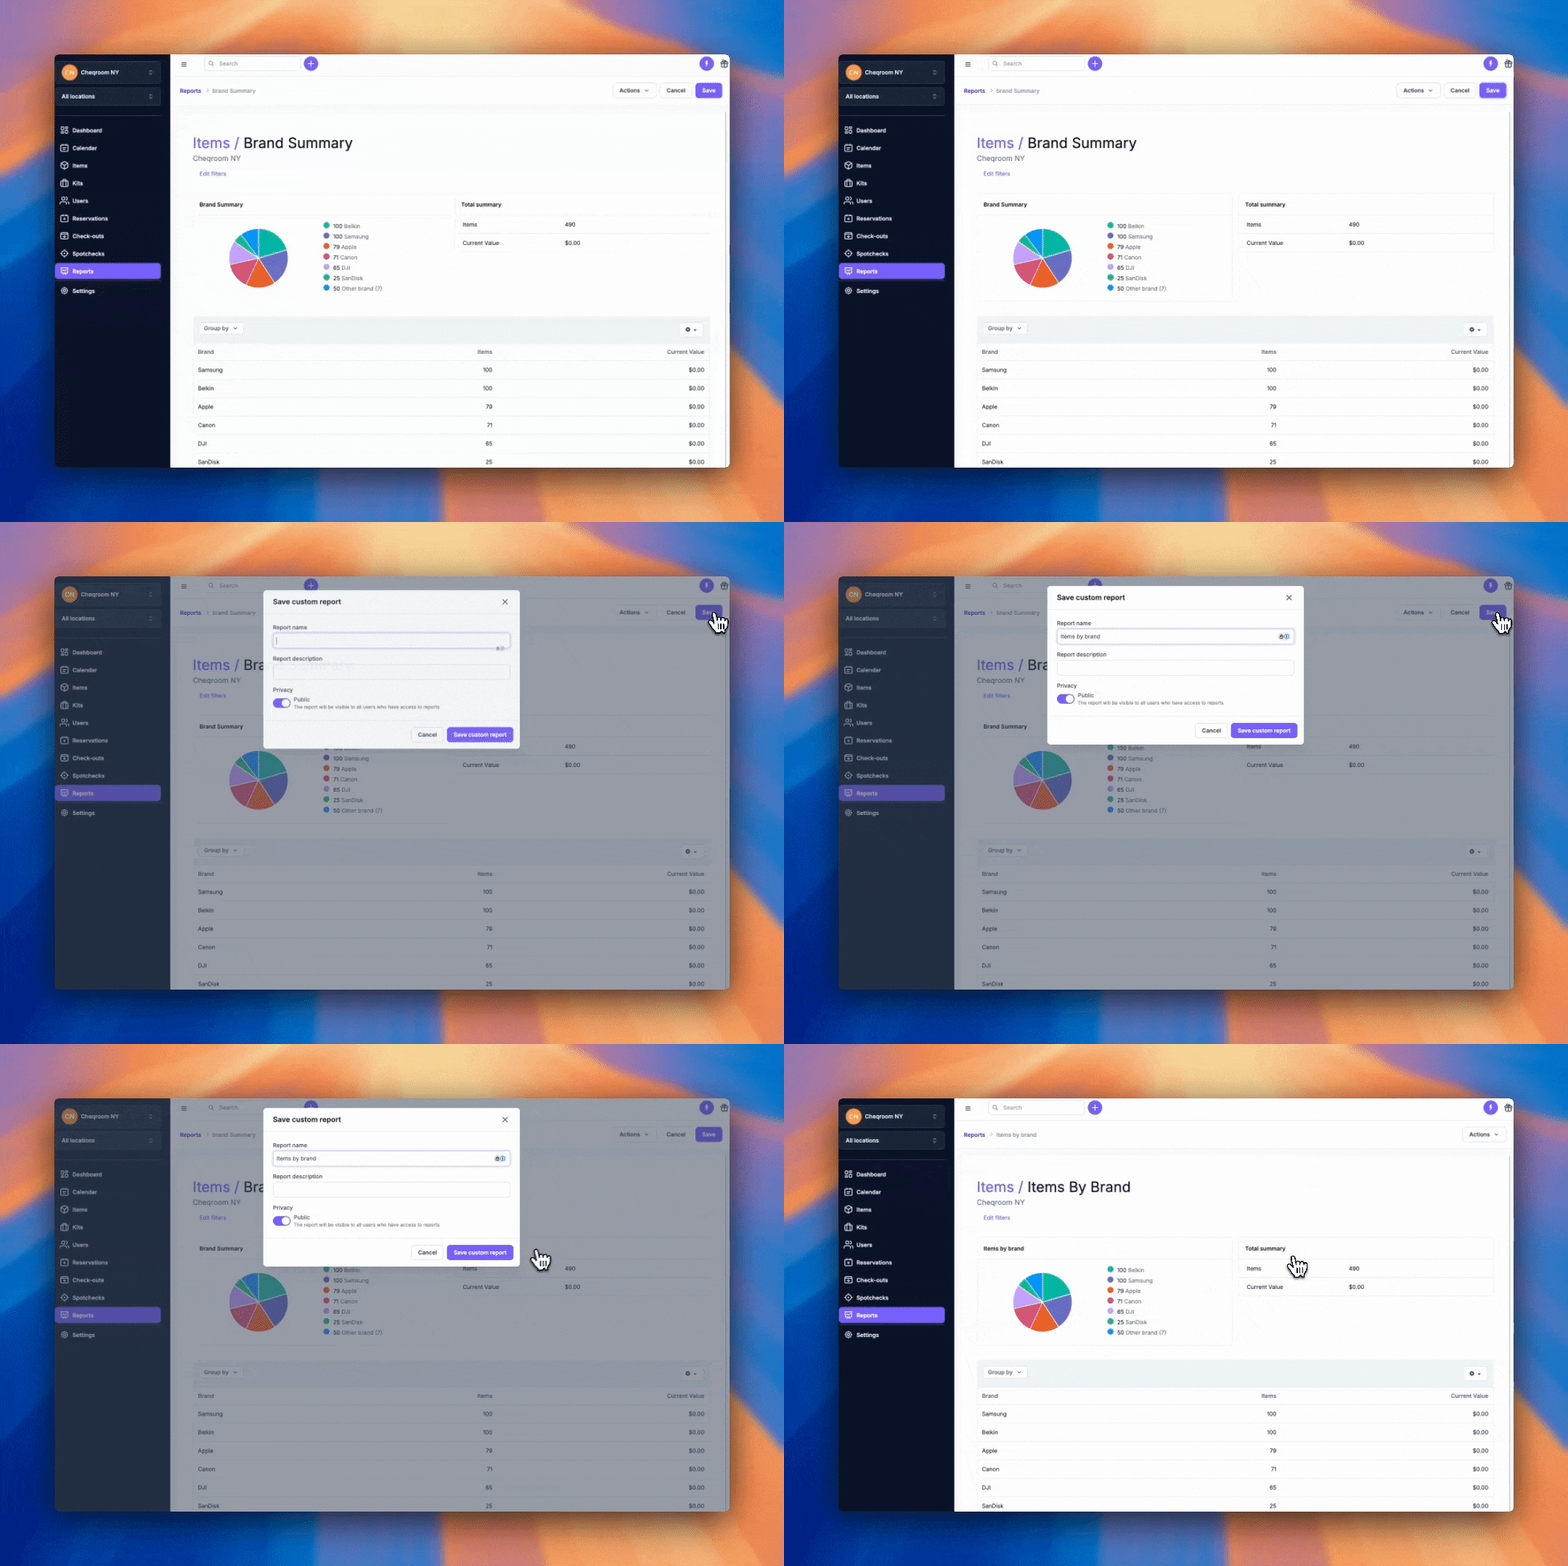
After doing that, exporting any report is easy:
-
Navigate to the desired Report.
-
Click Actions.
-
Select Export.
-
Select the file format.
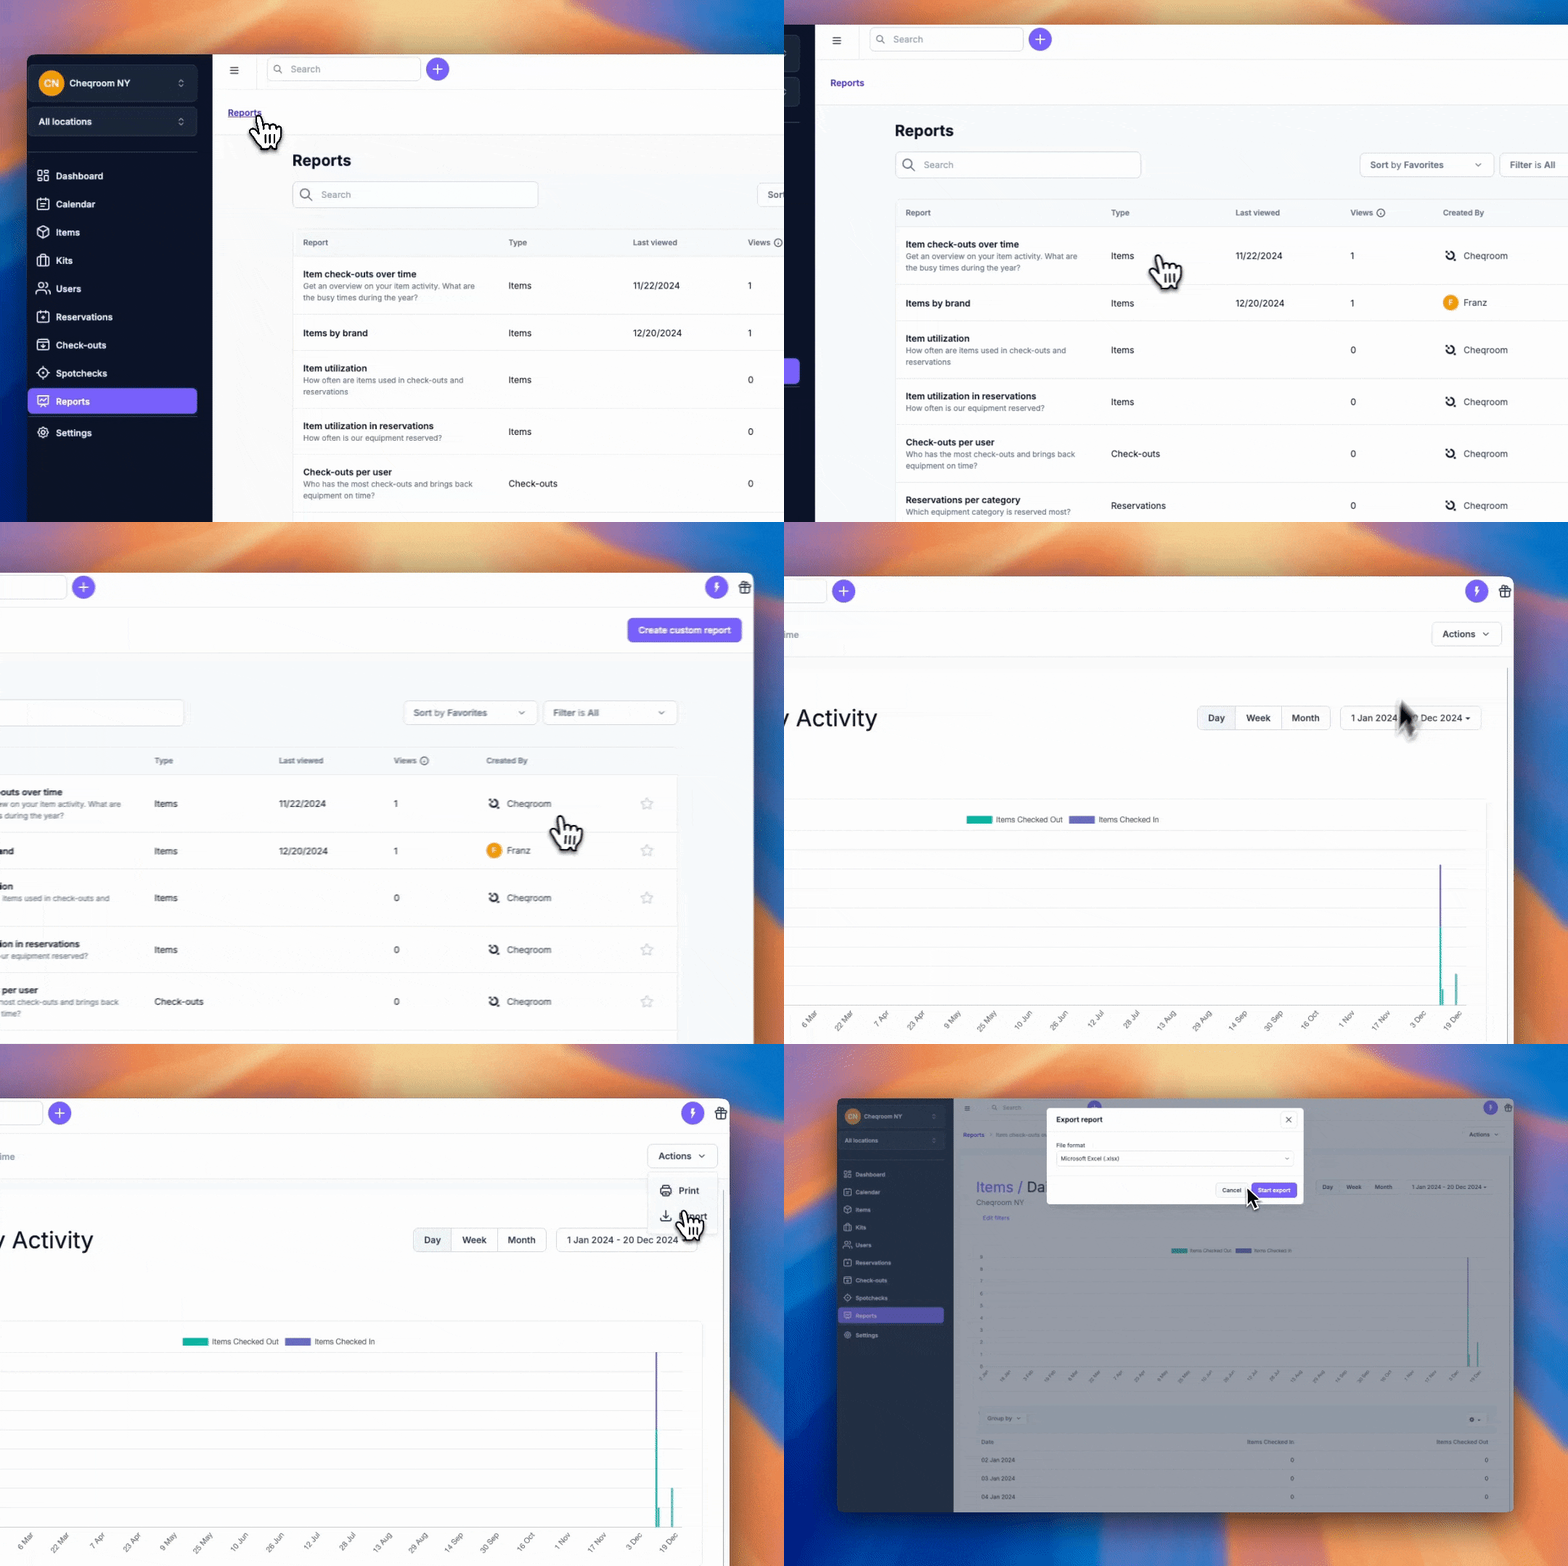
You can export the Report as a Microsoft Excel or CSV file, allowing you to share the data with others or integrate it with external tools.
Advanced Features
In addition to generating, saving, and sharing reports, Cheqroom offers advanced tools for filtering data, grouping insights, and managing user permissions.
Filtering
Cheqroom's robust filtering capabilities empower you to refine your Reports and extract the most relevant data for your needs. Here's how to leverage this powerful feature:
-
Look for the "Filters" section on the left-hand side of the Report page. This section will display filter options specific to the Report category (Items, Reservations, Check-outs).
-
Each filter option allows you to select specific criteria to narrow down the Report data. For instance, in an "Items" Report, you can filter by category (e.g., laptops, cameras), location (e.g., main office, conference room), or current status (e.g., checked out, available).
-
Combine multiple filters for more targeted results. For example, you can filter an Items report to show only overdue check-outs for laptops in a specific building — helping you quickly identify equipment that needs attention.
You can transform your Reports into highly focused insights that inform your equipment management decisions by effectively utilizing filters. Next time you work with Reports, use filters to get the most out of your data.
Bulk Item Utilization Report
If you manage bulk items or consumables, the Bulk Item Utilization Report helps you monitor stock levels and ensure you're never caught short. It provides key details like:
-
Current available quantity (what’s not currently checked out)
-
Total quantity
-
Last modified date (when item details or quantities were last updated)
Use this report to plan restocks, track usage, and stay informed on inventory health.
Note: Available only on plans with reporting and bulk items enabled. Contact support@cheqroom.com if you're unsure.
How to Use the Bulk Item Utilization Report
-
Go to the Reports tab in your Cheqroom account.
-
Scroll to or search for Bulk Item Utilization.
-
Click the report to open it.
-
To narrow results, click Edit filters and apply relevant criteria (e.g., item category or location).
-
To organize your data, use the Group by option (e.g., group by location, category, or custom field).
-
Review the overview data or export the report if needed.
This step-by-step helps ensure you get the most accurate, actionable view of your consumables and bulk inventory.
Grouping Reports for Deeper Insights
Cheqroom allows you to group report data by various fields to uncover patterns and trends more effectively. Whether you’re analyzing item usage, reservations, or check-outs, grouping helps you organize data by categories like location, contact, status, or even custom fields.
-
Go to the Reports tab.
-
Select the report of your choice.
-
Click on the dropdown menu for Group by.
-
Select from a list of relevant fields, including Custom Fields.
Use grouping to break down complex data into manageable, actionable insights.
Permissions
Cheqroom lets you control which users can view, save, or delete reports. Permissions are managed through user roles — for example, Admins typically have full access to all reports, while standard users may have view-only access depending on your configuration.
You can read more in our How to Manage User Roles and Permissions guide.